Tag Archives: puppets

Literature Puppets

litpuppets

Submitted by: Gina Eisenstein

This activity can be made to go along with any favorite story and allows students to actively participate in story time.

Goals:

  • To promote shape recognition, creativity and fine motor skills
  • To encourage listening comprehension by following along with a story
  • To create a felt puppet of a favorite story character

Before You Start:
Gather supplies for the project: large and small craft sticks, glue, craft cups, scissors, a variety of colored felt pieces, wiggly eyes, sequins, pom-poms, yarn, a permanent marker and other decorative items. Pour glue into craft cups ahead of time. This craft can be made to go along with most any children’s story. A whole collection of puppets can be created and mixed and matched for future stories. For this activity, mouse puppets were made to go along with Mouse Count by Ellen Stoll Walsh.

Let’s Get Started!
Step 1.
Have children cut out the shapes for their puppets (the teacher can have them precut and ready for younger children). For a mouse (as shown in the picture), the children will need to each have a large oval, a medium triangle, and two small circles.

Step 2.
Children can use small craft sticks to apply glue to items. Have them glue triangle, pointing down, on the top of the oval for the head. On both top corners of the triangle, they can glue a circle for ears.

Step 3.
Next, glue a short piece of yarn on the bottom, back of the oval (tail). To finish the face, children can glue on wiggly eyes, a pom-pom or sequins as a nose. Children can also draw on the nose and whiskers with a permanent marker if they wish.

Step 4.
Finally, the back of the mouse body should be glued to a large craft stick. Leave about 3 inches below the mouse. This will create the handle.

Step 5.
Let dry over night, and then use with story time!

Furthermore:
With Mouse Count, as you tell the story, 10 children could be holding their mice and roaming around the story area. One child could be the character of the snake in the story. With each mouse that is collected by the snake, that child would stand in a designated “collection area.” At the end of the story, the mice leave one at a time. This story helps preschoolers practice counting up to 10, and then back down from 10. The mice could also be used with the story Seven Blind Mice. That story practices counting, order, days of the week, and colors. You could use your mice puppets, or have other puppets. You could have children create puppets to fit any favorite story.

Products You May Need:

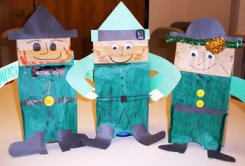
St. Patrick’s Puppet

pattypuppet

These charming, easy-to-make puppets are a fun St. Patrick’s craft!

Goals:

  • To create a whimsical leprechaun puppet for St. Patrick’s Day
  • To encourage creativity and build fine motor skills
  • To provide opportunities for dramatic play and storytelling

Before You Start:
Gather black, green and yellow construction paper, glue/ glue sticks and tape. Have children recycle a clean paper lunch bag from home (or the teacher may want to provide some). Prepare bowls of Colorations® Simply Washable Tempera paint and brushes. Set out Colorations® crayons, markers and other collage materials for the children to decorate their leprechauns, such as wiggly eyes, glitter, pom-poms and buttons. Create a few simple examples of what each of leprechaun’s parts may look like to show children before they begin. Note: Although the teacher should create examples to start the creative process, please allow the child to create his own leprechaun. It is not necessary for a child’s project to look like the real thing. Allow the child to be creative.

Let’s Get Started!
Step 1.
Demonstrate to children how to paint the flattened paper bags with green paint except for the bottom of the bag. The bottom will be the leprechaun’s head and face. Have children paint their own lunch bags and set aside to dry.

Step 2.
Provide children with their own sheets of construction paper, and if needed, help trace and cut out arms, hats and shoes.

Step 3.
Once bags are dry, show children how to tape or glue the arms into the side flaps of the bags. This is easier if the bags are opened slightly and the arms are taped so they reach forward in a hugging motion.

Step 4.
Allow children to decorate and personalize their puppets any way they like. Have them draw on their leprechaun’s face and body with crayons and markers and then glue on arms, wiggly eyes, buttons for a suit/shirt and other accessories they have cut out. Children could also make bowties out of construction paper or remnants of ribbon to glue on their bags.

Step 5.
Now everyone has a puppet for St. Patrick’s Day play! Have children form small groups and work as a team to create a short St. Patrick’s Day story. Or, simply display around the classroom for a holiday theme.

Furthermore:
Puppets provide an ideal opportunity to expand children’s creativity through imaginative play. You may want to have children act out puppet shows to demonstrate the stories they’ve created in their groups. Or, gather the class in a large group and have children take turns sharing their puppets.

Products You May Need:

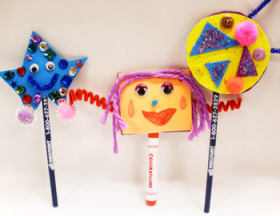
Pencil Puppets

pencilpuppets

Children will love creating their own personalized pencil puppets to use in the classroom or to give as gifts.

Goals:

  • To help reinforce shape recognition with a fun, open-ended activity
  • To encourage creativity and fine motor skills

Before You Start:
Gather a variety of colors of craft foam (poster board or recycled cardboard are also good options). Provide wiggly eyes, pipe cleaners, decorative collage items, scissors, pencils and Colorations® markers. Prepare small bowls of Colorations® Washable School Glue ahead of time for the activity. Have children draw a variety of shapes, such as triangles, circles and rectangles, each about 3 inches wide, on a piece of paper. Encourage them to be creative; the shapes do not have to be perfect. Allow them to pick their favorite shape and cut out to use for the activity.

Let’s Get Started!
Step 1.
Have the children trace their paper shapes onto a piece of craft foam or poster board. Each shape needs to be traced twice on the foam to create a front and a back for their pencil puppets. Encourage them to use different colors of craft foam if they wish.

Step 2.
Help children cut out their shapes as needed. Be sure the identical shapes are the same size.

Step 3.
Have children create a unique face on one the shapes using the markers and attaching other decorative items provided with glue.

Step 4.
Have children glue the two shapes together, making sure to leave a pencil-sized opening near the bottom. Larger collage items like pipe cleaners and feathers can also be sandwiched in between the two shapes before gluing them together in order to secure firmly to the pencil puppets.

Step 5.
Once glue has finished drying, children can top pencils with their own one-of-a-kind whimsical friends!

Furthermore:
The foam shapes can also be made into magnets to keep or use as gifts. Simply glue shapes together and omit the opening for pencils. Attach a small piece of magnetic strip to the back side and hang it up!

Products You May Need:

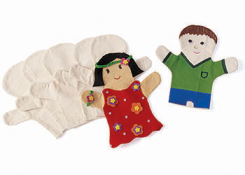
“Me” Puppet

mepuppet

Submitted by: Kristy Noland

As they create puppets of themselves, young ones will begin to explore their own uniqueness through this hands-on art activity.

Goal:

  • To integrate art into a social/emotional development activity

Before You Start:
You will need blank canvas puppets, several colors of yarn for hair (these can be pre-cut in different lengths) and fabric markers. Have on hand an assortment of ribbons and several different choices of fabric already cut out like clothes. Finally, make sure you have fabric glue and scissors.

Let’s Get Started!
Step 1.
Lay out all of the materials and encourage the children to select the pieces they want to create their puppets. Allow them to be creative – there are no rules!

Step 2.
Create your own puppet alongside the children and show it to them as an example.

Step 3.
This is a great opportunity to talk about differences that make each of us unique. Encourage discussion among the children about eye color, hair color, and favorite features.

Furthermore:
Proudly display the puppets around your center or classroom and use them for dramatic play.

Products You May Need: