Category Archives: Creative Arts

Contact Paper Snowman

contactsnowman

Submitted by: Stacey Beauchamp

Make double-sided snowmen that hang from the ceiling.

Goals:

  • To create an interesting snowman using clear contact paper to hang in the hallway for the holidays
  • To identify shapes used to make the snowman

Before You Start:
Prior to doing this craft with your class, you will need to cut out two 6-inch circles from clear contact paper. Cut out round black circles from construction paper for the eyes and mouth. Cut out orange triangles from construction paper for the nose. Cut out multicolored squares for the scarf. The last scarf square should be double the size to fringe one end with scissors. Trace top hats from black construction paper. Preparing each of these items prior to the activity with your class will help make this craft easy and organized for everyone!

Let’s Get Started!
Step 1.
Children should peel off the protective paper from the contact paper.

Step 2.
They can distribute the pieces cut out for the eyes, nose, mouth and scarf onto the sticky side of the contact paper.

Step 3.
Children can then lay the hat at the top of the contact paper.

Step 4.
The teacher should help each child peel off the protective paper from another sheet of contact paper and place it on top of the first piece.

Step 5.
This creates a two-sided snowman to hang from the ceiling.

Furthermore:
Throughout the holiday season, your class will be able to see their projects wherever you decide to hang them!

Products You May Need:

Animal Effigy Coil Pottery

coilpottery

Submitted by: Robyn Priest

Children can create an animal-inspired coil pot to treasure for years to come.

Goals:

  • To learn coil pottery techniques and create original, 3-Dimensional artwork
  • To introduce Native American cultural crafts and traditions

Before You Start:
Gather materials needed: non-hardening clay (for practice), Crayola® Model Magic® or other air-dry modeling clay, dough mats, Colorations® markers, pipe cleaners, wiggly eyes and feathers.

Let’s Get Started!
Step 1.
Expose children to Native American pottery examples and provide a global view of how pottery is used across the world. Provide a demonstration of how to build a coil pot. Explain that they will choose their own animal to inspire their artwork, and allow time for them to plan by drawing or writing about their ideas. Children can use non-hardening clay for practice.

Step 2.
Provide modeling clay to the children, and have them divide the material into four quarters. Explain that one quarter will be used to create a slab bottom. Three quarters will be used to create a coil for the pot.

Step 3.
Provide modeling clay to the children, and have them divide the material into four quarters. Explain that one quarter will be used to create a slab bottom. Three quarters will be used to create a coil for the pot.

Step 4.
Then, have children shape a smooth even coil (it will look like a long snake shape). The coil will be wrapped around the perimeter of the slab bottom. The coil pot is complete when they wrap the coil around on top of itself a few times.

Step 5.
Provide students will additional clay to mold the head and tail of their animals and they can color with markers if they wish. Other materials, such as feathers, wiggly eyes and pipe cleaners, can also be added for decoration. (If you use Model Magic® allow it to dry before decorating with washable markers.)

Step 6.
Display the final pots around the classroom.

Furthermore:
If time permits, allow students to create an environment for their animal. Incorporate this art project into a lesson about Native American culture and art as well as other cultures that create coil pottery. This is a great opportunity to describe how people’s experiences and culture influence the development of specific types of artwork.

Products You May Need:

Make a Monster

monster

Submitted by: Yasmeen El Dahan

Children will learn about parts of body while making crazy, silly monsters!

Goals:

  • To learn about the parts of the body and face with a creative craft
  • To encourage individuality and to understand that we are all unique
  • To exercise fine motors skills

Before You Start:
Each child will need a sheet of thick construction paper, paintbrushes and paint! You will also need to gather glue, yarn, wiggly eyes and/or sticker eyes, scissors, crayons, markers and other collage materials. You can also start off this activity by reading a book about monsters!

Let’s Get Started!
Step 1.
Give the children a piece of paper and paints. Have them paint the whole sheet of paper, mixing colors and allowing them to be creative!

Step 2.
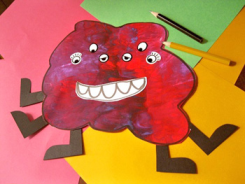
Once the paint is dry, explain to the children that they are going to make ‘monsters’ from their artwork. Ask them if they see a shape in what they have painted. Give them markers and crayons, and encourage them to draw a shape for their monster’s body.

Step 3.
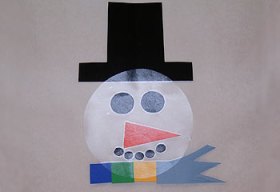
Talk about the parts of the body, how people have two legs, two eyes, two arms, one nose, one mouth, etc. But, monsters are different! They can have as many or as few body parts as their creators like. Then, they can cut out the outlined shape, the body of their monster. Younger children may need help with this part.

Step 4.
Let each child have access to wiggly eyes, glue, scissors, crayons, yarn and construction paper. They can start making their monsters any way they like. It’s fun to ask them how many eyes or legs their monsters will have and see them think up the largest number they know. For other body parts, depending on the age and skill level of the children, you can either give them construction paper pre-cut into arms, legs, noses, ears, mouths, etc., or give them construction paper to draw on and cut out. Let them glue the body parts all over the monster. You can also give them yarn to make hair!

Step 5.
Once their monsters are done, have children bring their monsters to the carpet/circle time gathering, and discuss them one by one. This is a great opportunity to talk about individuality, how it is good to be unique and how, like our monsters, we are all different. You can then move onto the children themselves and discuss their similarities and differences. How are their monsters similar to us and how are they different?

Furthermore:
This is a very flexible theme; you can focus simply on numbers (this monster has ten eyes, but we have only two), or you can discuss placement (this monster’s legs are on his head!) and even colors. For example, you may ask, “What color are the monster’s eyes? What color are your eyes?” The monsters make a fun display for bulletin boards. There are lots of different themes that you can apply with this activity; you can do it while learning the letter M, for Halloween, for a unit on ‘same and different’ or even a unit on friendship.

Products You May Need:

Spray Paint Art

spraypaintart

Submitted by: Amy Nunley

This is a great open-ended activity for developing motor skills and teaching color blending.

Goals:

  • To teach about color blending
  • To develop fine motor skills

Before You Start:
Gather your materials: spray bottles, several different colors of Liquid Watercolor™ and a large old white sheet you are no longer using. Cut the sheet in half and fill your spray bottles ahead of time. Hang the two halves of the sheet on a fence, approximately 1-1/2 feet above the ground.

Let’s Get Started!
Step 1.
Take children outside and show them the spray bottles with paint and the sheets you have placed on the fence. Explain how to spray the sheets (not each other).

Step 2.
Demonstrate how to spray more than one color of paint on one of the sheets. Point to what is happening on the sheet, and talk about what happens when the colors blend together.

Step 3.
Let the children have fun spraying the different colors on the sheets until all of the white space on the sheets has been covered.

Step 4.
Allow to dry in the sun.

Step 5.
Once dry, drape the sheets from the ceiling, make curtains, table cloths, or let the children use as capes or other props for dramatic play.

Furthermore:
By hanging the sheets against something with a pattern, such as a chain link fence, and allowing it to dry there, it will create a pattern on the sheet when dry. You may also provide children with screens or sponges to use with the paint on the sheets.

Products You May Need:

Washable Sidewalk Chalk

sidewalkchalk

A springtime favorite! Go outdoors to make your own bright, bold sidewalk chalk with BioColor®.

Goals:

  • To encourage creativity
  • To promote color recognition
  • To teach cause and effect through creative arts

Before You Start:
You will need Plaster of Paris, Biocolor® paints in various colors and glitter. Additionally, you will need a muffin pan and mixing bowls.

Let’s Get Started!
Step 1.
Combine two parts plaster of Paris to one part BioColor® paint in a bowl and stir until the consistency is that of cake frosting, adding more Plaster of Paris if needed.

Step 2.
Spoon mixture into small, waxed cups or non-stick muffin tins immediately after mixing.

Step 3.
The mixture will dry within minutes, but allow chalk to set overnight before use.

Step 4.
Remove from container and watch the fun begin!

Furthermore:
You might also want to add glitter to produce a shimmering effect. Swirling colors will result in a marbling effect, and layering colors will produce a striped-chalk effect. You can also consider using ready-made sidewalk chalk if you don’t have the time to make it yourself.

Products You May Need:

Liquid Watercolor™ Spray Paint

watercolorspray

Submitted by: Alison Engling

This is a good activity to do in the grass, or you can just spread a lot of newspapers in an open area.

Goals:

  • To teaching primary and secondary color recognition
  • To explore creativity and messy fun

Before You Start:
Adults put Liquid Watercolor™ into spray bottles. Use watercolor paper for the most substantial and best blended results, but also try it with Liquid Watercolor™ Texas Snowflake coffee filters or tissue paper. (Note: these will fall apart if too soaked).

Let’s Get Started!
Step 1.
Use a theme, such as nature (leaves, flowers, etc.) and have the children cut out their own shapes.

Step 2.
Have children spray the paper to see what effects can be created.

Furthermore:
This is an excellent introduction to how primary colors can be blended together to create secondary colors.

Products You May Need:

Hand-Made Band

Instruments 005

Submitted by: Laurel Johnston

A fun, eco-friendly activity that uses recycled goods from home to create shaker and string instruments that allow for the exploration of rhythm and sound.

Goals:

  • To use recycled materials to create a creative instrument
  • To learn about rhythm and sounds created by different instruments
  • To work together to create unique sounds when instruments are played together

Before You Start:
Have children collect clean plastic food containers (with lids,) tin cans or plastic water bottles, rubber bands, and tissue boxes. You will also need recycled craft paper rolls, paint and decorating items (like glitter, stickers, stamps, etc.), unsharpened pencils, and uncooked rice and beans to use as the filling for shakers.

Let’s Get Started!
Step 1.
Make sure all cans and containers are washed and dried thoroughly.

Step 2.
Let the children decorate the containers with craft items of choice. It may be easier to wrap some of the containers with paper than to paint on the surface.

Step 3.
To make a guitar, have the children wrap rubber bands of varying thickness around the opening of the empty tissue box. “Plucking” the bands will create different kinds of sounds over the opening.

Step 4.
To make a cardboard shaker, seal up one end of the craft paper roll with thick paper held in place tightly with a rubber band. Pour in some uncooked rice and/or beans inside and seal the other end of the shaker. To make a plastic shaker, pour the rice/beans into a plastic water bottle and replace the lid.

Step 5.
To make a guiro, children can run an unsharpened pencil along the texture of the tin can or plastic water bottle. Tape a craft stick or pencil to one side of the can to act as a handle. Tape open ends of the cans to avoid sharp edges.

Step 6.
To make a drum, place the lid on the plastic food container and let the children pat on it with their hands or the eraser end of an unsharpened pencil.

Step 7.
Have the children practice “playing their instruments.” Set different rhythms for them to follow by clapping your hands.

Furthermore:
Let the students have a “solo” or create a symphony by seating students in sections by instrument and when you point to them they play. No instrument will sound exactly the same, and the students will have fun exploring the sounds.

Products You May Need:

Gelatin Giggles

gelatin

Watch as the various colors “bleed” in, out and around the see-through gelatin!

Goals:

  • To encourage cause and effect
  • To promote exploration of materials
  • To have fun with a unique sensory activity

Before You Start:
Gather materials: plain unflavored gelatin, plastic droppers, Liquid Watercolor™ paints, tall containers or mixing bowls and an art tray.

Let’s Get Started!
Step 1.
Dissolve plain gelatin according to directions on package.

Step 2.
When gelatin is ready, pour into tall containers or mixing bowls that have been lightly greased and refrigerate overnight.

Step 3.
When set, release the gelatin upside down onto an art tray.

Step 4.
Set out paint cups filled with various Colorations® Liquid Watercolors. Using extra long droppers, allow the children to dip ‘n’ poke into the wobbly gelatin. Watch the colors move around inside the gelatin!

Furthermore:
Cut the gelatin into “worms” or other fun shapes, and let children explore with their hands. Gelatin makes a wonderful tactile activity.

Products You May Need:

Painting Outside the Hole

holepainting

Submitted by: Laura Durbrow

This open-ended art activity allows children to learn to create around negative space!

Goals:

  • To learn how to create around negative space
  • To use imagination and creativity
  • To encourage experimentation with different art materials

Before You Start:
Gather materials for the activity. These can include a variety of painting tools, brushes, watercolor and tempera paints, easel/art paper and scissors. Before putting art paper on an easel or art table for painting, cut a hole anywhere on the paper. The hole can be a geometric shape, a holiday shape or an abstract shape.

Let’s Get Started!
Step 1.
Show the children the paper without any instructions, so that they can decide what to do around the shape.

Step 2.
Allow the child to confront the new materials on his own without any instructions. Present the materials and step back. The teacher may want to explain that there is no right or wrong way to design or draw on their paper; they get to decide.

Step 3.
Let child’s artwork dry. Hang on display in the classroom or center.

Furthermore:
This can also be done on a smaller scale on the drawing table with drawing paper and markers or pens.

Products You May Need:

Top Hat

tophat

Submitted by: Anna Reyner

This project is ideal for preschoolers through school-age.

Goals:

  • To create a special hat that can be decorated in many different ways
  • To create a prop for dramatic play

Before You Start:
Gather white paper top hats, crayons, Colorations® Foam Paint, glitter, rhinestones, markers and self-stick art foam.

Let’s Get Started!
Step 1.
First apply crayon designs onto the center and rim of the hat while it’s still laying flat – that is, before you “pop” it up into three dimensions.

Step 2.
Apply paint over the crayon designs to make a “crayon resist” effect. If you use Colorations® Foam Paint, it will dry right away. Or use any other paint and let it dry.

Step 3.
Add a pipe cleaner to the top for a “boinger” that moves as you walk. Twist the pipe cleaner around your finger or a pencil to make it spring. Attach the pipe cleaner with a piece of self-stick art foam, or poke two small holes through the top and twist it through.

Furthermore:
The center top and rim of this hat are made of tag board which is thick enough to sustain many water based paints, glitter and heavier collage elements. You can even tissue paper collage these sections with mildly watered down glue and colored tissue. The accordion fold sides of the hat, once popped up into 3 dimensions, is a thinner paper. With younger children leave this part white or it might tear when you decorate it. Older children can use markers or a thin layer of Foam Paint to color the sides.

Products You May Need: